Lesson 1: Get down on their level- don't be afraid to get close (or use your zoom)
Ok, so I told you this would be basic but it's soooo true. I can't tell you how many times I've seen photos and thought "that is such a cute photo but it could have been sooo much better if it wasn't so far away! I wish I could zoom in a see that cuties face."
Enter EXHIBIT A-

Well, its not really a bad photo. I actually think it's pretty cute. But why not take the extra time and get down on your knees. Zoom in a little bit. Get those distracting brightly colored toys out of the viewfinder so that the focus is left on you adorable little child. Let's try this again.
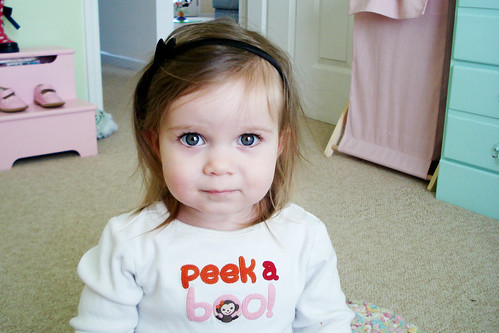
EXHIBIT B-

She is pretty cute isn't she, despite the "deer in the headlights" look she's giving me. But now, at least the focus isn't on all that stuff around her but instead it's on those big blue/grey eyes! Gotta love em'! But really, isn't that just so much better? And this was all done with a regular point & shoot.
And here is a similar one done with my dSLR and my 35mm 1.8 lens.
EXHIBIT C-

Those eyes are crystal clear. But either one of these shots would be perfect to print off as a 5x7 and put in a cute little frame. Isn't that all we really want anyway?
And here, just because I like to take things a step further, I added a navy exclusion layer and popped it in a sweet frame to give it a vintage-y, shabby-chic feel! (maybe I'll teach you that a bit later, *wink*)

Well, that's it for today! I don't want to unload too much on you on the first day. I have lot's more to share and I hope you'll all come back for lesson 2. Have a fabulous weekend!


Thanks Hana!!...I am a regular reader of your blogs and a fan of your Photographs!!! we really Thank You for sharing your pictures as well as your tips, it is so awesome and will be help full for lot of us...expecting more tips from you in future..:)
ReplyDelete-Satheesh
You make it sound so simple! I will be trying your tips with my next pictures...thanks for the help. Can't wait to see more!
ReplyDeleteI'm following your blog b/c I love the pics you take of your kids...the two things I like most and would LOVE to learn how you do is it seems like most of your pics (snapshots) are indoors w/o flash and yet they aren't blurry. In fact, i like how super sharp, esp. the eyes, always are.
ReplyDeleteIn the pictures from today, was there any post processing done (besides the frame one)? or are they just that crisp?
Thanks!!
-elizabeth
Thanks for the comments! Glad that these tips will be helpful to some of you.
ReplyDeleteElizabeth, I aim to get sharp eyes right out of the camera. I do this on my dSLR by choosing my focus point and placing it on one of the eyes of my subject. I usually don't set my aperture wide open and for the picture in this post it was set at 2.5. This allowed both eyes to be super crisp since the DOF was not as shallow as it would have been at 1.8. I did do post processing on the photos. Basically a curves adjustment to brighten and add contrast. I did do a slight eye sharpening but just a smidge. If you could see the photos in camera you would see how sharp they already are...in both cameras. If you are using a point&shoot camera then try to shoot in the room in your home that gets the most light. Position your subject so that they face a window. This will help your camera to focus and you will have a much better chance of getting a sharp photo. I hope this answer helps you a bit and I hope you'll come back for more tips! Thanks for commenting!
Super cute, Hana. I love the deer in the head lights look! You know, if you wanted it all monochromatic, you could run a hue/saturation layer mask and remove the red in her shirt and the blue in the background. I think the coloring in her eyes and lips are perfection! Too cute!!
ReplyDeleteThanks Hana. I have a D90 too but with a 18-105 f/3.5-5.6. I usually use autofocus-auto so I guess I need to try to practice more with the spot focus. :) I also have problems getting indoor pics w/o flash not blurry b/c in Aper. priority, it wants to make the shutter speed slower than what my toddler can sit still for or i can handhold for.
ReplyDeleteI just found your blog and I am really looking forward to this series of posts! I use a Canon Powershot because I love keeping my camera in my pocket anytime I can and my husband just got a Nikon D90 for Christmas. I welcome your tips, is there a way for me to subscribe to your blog via email?
ReplyDeleteGreat tips! When I photograph my nieces and nephews, I never think to eliminate distracting toys like those! I mean, yeah, I go on my knees and stuff...but man, I feel a little dumb about the toys, haha. Can't wait to read more!
ReplyDelete